

Create a bootable USB drive on Windows 10 / 8 / 7, using the Rufus ISO freeware program
 Screenshots in this tutorial were taken on Windows 7 (which we used to create a Windows 10 bootable flash drive from the ISO disc image), but the steps are exactly the same on all recent versions of Windows. It will work whether your PC has USB 1.0 / 1.1 ports or USB 2.0 ports, no difference there. The free, downloadable tool called "Rufus" works on Windows XP and later, both 32-bit and 64-bit versions of Windows. It's widely regarded as the fastest and most reliable way of creating bootable ISOs on Windows. (It's the de-facto tool used for new users who want to try out a Linux distribution like Ubuntu or Mint as a "
live CD
", or "live USB
" in this case.) Many Linux distros will fit on a regular CD. To make bootable media for Windows 10, you need a DVD or a USB drive (4Gb+).
Step 1: download Rufus
 No installer is needed for Rufus: you directly download the program executable. Click the download link in the official site at https://rufus.akeo.ie/ ("
ie" is Ireland's very own internet country code). Save the file (for example) on your desktop: it will be launched from there. Nothing will be installed, and no changes will be made to Windows (like adding shortcut links or otherwise). Note that running Rufus requires elevated privileges (the administrator's password).
Step 2: insert the USB drive
 To make a bootable flash drive, all existing data on it will be wiped, and irrecoverable. So, make sure to first backup any important files, or that the flash drive doesn't contain anything you want to keep.
Leaving some files on your USB stick prevent Rufus from creating the bootable drive, but they'll be erased. For a Windows installer, remember that you'll need a flash drive of at least 4Gb (gigabytes) in capacity.
Step 3: launch Rufus
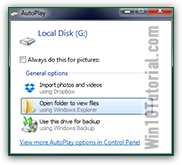
 Once you've plugged in your USB, and either it's visible or you got the "Your device is ready to use" confirmation in the notification area system tray, launch Rufus and confirm the UAC prompt (by entering the administrator's password or by clicking "
Yes
"). You should now see your USB drive preselected at the top; make sure that it's the right one. Click on the "Device" dropdown to pick another target device: 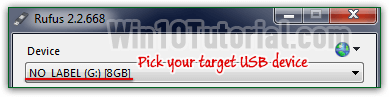
Leave everything else with its default, but optionally type a meaningful description (like "Windows 10 Insider Preview
") in the "New volume label" text box. Under the "Create a bootable disk using" checkbox, which should be checked, pick "ISO Image" from the dropdown. Then, click on the disc icon (CD/DVD), navigate to where you saved your Windows 10 ISO file, and double-click on it to select it: 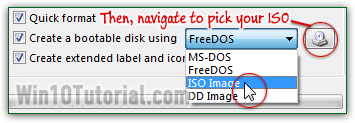
Create your bootable drive
Now click on the Start button in Rufus: clicking "Cancel" on the "All data on device [name] will be destroyed
" final confirmation message is your last chance to check that the right USB drive is selected, and that you've saved all the files you wanted to keep - the process starts once you click "OK", and everything on the flash drive will be wiped. 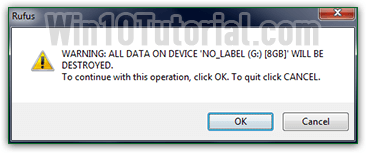
Burning the USB from an ISO disc image may take a while - at least 5 minutes, but how long exactly depends mostly on your hardware, and how busy it is (CPU-wise, mostly). Just minimize the Rufus window and go take a break, or work on something else. ![]()
Step 4: rename and eject your flash drive
Once the progress bar is filled, and the status message area says "READY", click on the Close button to exit Rufus. If you ended up with a weird / random device name, just rename it in Windows Explorer (or "File Explorer
", if you are on Windows 10). Right-click on the USB drive and choose rename, or just hit the F2 key when it is selected. 
You are done! Safely eject your flash drive, and go install your operating system. (But first, label your USB drive - a useful tip learned the hard way :)